How to add a Calculated Item to a PivotTable


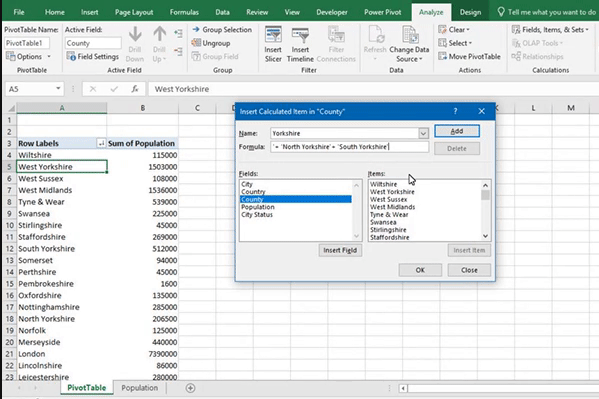
We can use Calculated Items to merge multiple row items in a PivotTable. For example, you would use Calculated Items if you had data for North, South, East and West Yorkshire and you wanted to merge the data into one Item called Yorkshire. 


To create a Calculated Item, select a row item and then go to the Analyse tab. On the ribbon click on Fields, Items, & Sets and then choose Calculated Item.


In the Name field, type in the name of your new item


In the Formula field, type the formula to sum the multiple fields together. 


For example, = ‘East Riding of Yorkshire’ + ‘North Yorkshire’ + ‘South Yorkshire’ + ‘West Yorkshire’


A quick way to insert a Field Item is to double click on the field you want to insert from the Items box. 


Finally click ADD and OK and this will apply your new Calculated Item


This content is aimed at the Intermediate level.   Click here to view our course overview.

How to move a PivotTable to a new sheet


To move a PivotTable to a new worksheet, select your PivotTable and go to the Analyse tab. On the Analyse tab click Move PivotTable, this will open the Move PivotTable window. Finally select New Worksheet and click OK. This will now have moved your PivotTable to a new worksheet.


This content is aimed at the Intermediate level.   Click here to view our course overview.

How to move a PivotTable to an existing sheet


To move a PivotTable to an existing worksheet, select your PivotTable and go to the Analyse tab. On the Analyse tab click Move PivotTable, this will open the Move PivotTable window. Next, select the Existing Worksheet option and click in the Location box. Once you have selected the location box, select the worksheet and the cell that you want to move your PivotTable too. Finally click OK and this should of moved your table to the specified location.


This content is aimed at the Intermediate level.   Click here to view our course overview.

How to change the Summary Function in a PivotTable


A Summary Function is a formula such as SUM, COUNT and AVERAGE. If you want to change the function that your table uses, then right click on your table and select Value Field Settings. This will then open the Value Field Settings window. In the Summarize Value Field By box, choose the function that you want your PivotTable to run and then click OK.


This content is aimed at the Intermediate level.   Click here to view our course overview.

How to add and remove banded rows and columns to a PivotTable


If you want to make PivotTables easier to read, then why not apply banded rows and columns. To do this click on your PivotTable and go to the PivotTable tools tab. Next select the Design tab and check the Banded Rows and Banded Columns boxes. This will then provide more distinct rows and columns to your table.


This content is aimed at the Intermediate level.   Click here to view our course overview.

How to add and remove row and column headers in a PivotTable


If you want to add or remove headers from your PivotTable, click on your PivotTable and go to PivotTable tools tab. Next, select the Design tab and check the Row Headers and Column Headers boxes. You will now see the headers being applied.


This content is aimed at the Intermediate level.   Click here to view our course overview.

How to add and remove +/- buttons to a PivotTable


If you want to be able to collapse and expand data in your PivotTable, then you must apply the Expand and Collapse buttons. To do this, click on your PivotTable and then go to the PivotTables tools tab. Next go to the Analyse tab and select the +/- Buttons icon. If you want to remove these buttons, unselect the+/- Buttons icon.


This content is aimed at the Intermediate level.   Click here to view our course overview.

How to ungroup dates in a PivotTable


If your dates are grouped into years, quarters, months, etc. in a PivotTable then you can ungroup them. To do this, right click on your header where you have the dates and select ungroup. 


This content is aimed at the Intermediate level.   Click here to view our course overview.

How to add and remove PivotTable Field List to your screen view


If the Field List doesn’t appear on your screen when you click on your PivotTable, then you can apply it to your screen. Click on your PivotTable and go to the Analyse tab under PivotTable Tools. On the Ribbon select the Field List tool. 


This content is aimed at the Intermediate level.   Click here to view our course overview.

How to insert a Timeline into a PivotTable


You can use Timelines to help filter PivotTables based on dates. To insert a Timeline, go to the Analyze tab and select Insert Timeline. This will open the Insert Timelines window. Choose the field you want to create a Timeline for and then click OK. This will now put a Timeline into your spreadsheet.


This content is aimed at the Intermediate level.   Click here to view our course overview.

How to filter a PivotTable using a Timeline


To filter a PivotTable using a Timeline click on the relevant Year(s), Quarter(s), Month(s) or Day(s) depending on how your timeline is laid out. 


This content is aimed at the Intermediate level.   Click here to view our course overview.

How to change the style of a Timeline


If you click on your Timeline you will notice the Timeline Tools tab appear. Click on it and you will see the Timeline Styles provided. Click through the styles to personalise how it looks.


This content is aimed at the Intermediate level.   Click here to view our course overview.

How to change the Time Level on a Timeline


On a Timeline you can filter based on either Year, Quarter, Month or Day. To change the date options, click on the Time Level dropdown located in the top right of your Timeline. Finally, select the date option you want to filter your dates by.


This content is aimed at the Intermediate level.   Click here to view our course overview.

How to apply the Selection Label on a Timeline


The Selection Label is a label that appears on the top left of a Timeline. The label shows you the data you have selected. To apply the Selection Label, click on your Timeline and go to the Timeline Tools tab. On the Ribbon in the Show group check the Selection Label box and this will apply it. If you want to remove it just uncheck the Selection Label box.


This content is aimed at the Intermediate level.   Click here to view our course overview.

How to clear a filter on a Timeline


Once you have filtered your data you can then clear the filters. To do this click on the Clear Filter icon in the top right corner of the Timeline. If you like using shortcuts then why not use ALT + C to clear your Timeline filter.


This content is aimed at the Intermediate level.   Click here to view our course overview.

How to view your PivotTable in different report layouts


If you want your PivotTable displayed in a different way, then you can change the report layout. To do this go to the Design tab under PivotTable Tools. Next select Report Layout and from the dropdown choose a layout.


Compact Form – Displays data from multiple row fields in one column and uses levelling to distinguish items.

Outline Form – Displays one field in a column and allows subtotals at the top of each group. 

Tabular Form – Displays one field in a column.


This content is aimed at the Intermediate level.   Click here to view our course overview.

How to insert and remove a blank line after each item in a PivotTable


If you feel that your PivotTable is quite compact when working with multiple rows, then you can space your data, so you can read it more easily. To do this go to the Deign tab under PivotTable Tools and select Blank Rows from the Layout Group. In the dropdown choose the option you want.


This content is aimed at the Intermediate level.   Click here to view our course overview.

How to create a Calculated Field in PivotTables


A Calculated Field is a field created by a formula that runs off data in your PivotTable. To create a Calculated Field, go to the Analyse tab and select Field, Items and Sets. From the drop down select Calculated Field. In the Name box, type in the name of your new calculated field. In the formula bar type in the formula that you want to calculate. For example, if I wanted to create a formula that added VAT onto our Amounts then your formula would be =AMOUNT*1.2. 

Once you have completed your formula, click ADD and then OK. This will then add your calculated field to your PivotTable.


This content is aimed at the Intermediate level.   Click here to view our course overview.

How to format a PivotTable


If you want to format your PivotTable, right click and select Value Field settings from the menu. This will then open the Value Field Settings window where you need to select Number Format. From the Format Cells window select the required format option then click Ok. This will now format your table.


This content is aimed at the Intermediate level.   Click here to view our course overview.

How to create a PivotTable


To put data into a PivotTable, highlight your data and select the Insert tab. On the Insert tab select PivotTable, this will open the Create PivotTable window. Make sure the range of cells it is showing is correct. Next select where you want the PivotTable to be placed. You can either select it to be on a New Worksheet or an Existing Worksheet. Once you have chosen an option, click OK and Excel will now have created a PivotTable for you.


This content is aimed at the Intermediate level.   Click here to view our course overview.

How to create a PivotChart


To create a PivotChart, highlight your PivotTable and select the Analyse tab. On the Analyse tab click on PivotChart and then choose the chart type that you want to use. This will then place your chart into your spreadsheet. 

If you like shortcuts, highlight your PivotTable and press F11 and this will create a PivotChart on a new sheet. If you want to create a PivotChart on the same sheet as your table then again highlight your PivotTable and press ALT + F1. This will now create a chart on the same sheet as your PivotTable.


This content is aimed at the Intermediate level.   Click here to view our course overview.

How to group dates in a PivotTable


In PivotTables you can group your dates in a variety of ways such as years, quarters and months. To do this right click on the dates in your column or row headers and select Group from the menu. When the Grouping window appears choose how you want the dates grouped from the options provided. 


This content is aimed at the Intermediate level.   Click here to view our course overview.

How to add and remove Grand Totals on a PivotTable


If you want to add Grand Totals to your Pivot Table, then select your PivotTable and click on the Design tab under PivotTable Tools. On the Ribbon select Grand Totals and choose where you want them to be applied to your table.


This content is aimed at the Intermediate level.   Click here to view our course overview.

How to sort rows in a PivotTable


If you want to sort a data field that you have placed into the Rows Area, then click on the Row Labels dropdown on your PivotTable and choose the sorting option that applies to how you want to sort that field.


This content is aimed at the Intermediate level.   Click here to view our course overview.

How to sort columns in a PivotTable


If you want to sort a data field that you have placed into the Columns Area, then click on the Column Labels dropdown on your PivotTable and choose the sorting option that applies to how you want to sort that field.


This content is aimed at the Intermediate level.   Click here to view our course overview.

How to display Subtotals to a PivotTable


If you want to display Subtotals on your PivotTable then select your PivotTable and go up to the PivotTable Tools tab and select Design. On the Ribbon click on Subtotals and choose where you want the Subtotals to be displayed. 


This content is aimed at the Intermediate level.   Click here to view our course overview.